
The best pita is made with homemade pastry - yufka. You can use sheets of phyllo dough although it is not quite the same. Store-bought phyllo dough is great for layering like in baklava, but it's not flexible to be rolled up like a traditional pita.
Pita, in Bosnia, is a general term for thin pastry with savory or sweet fillings.
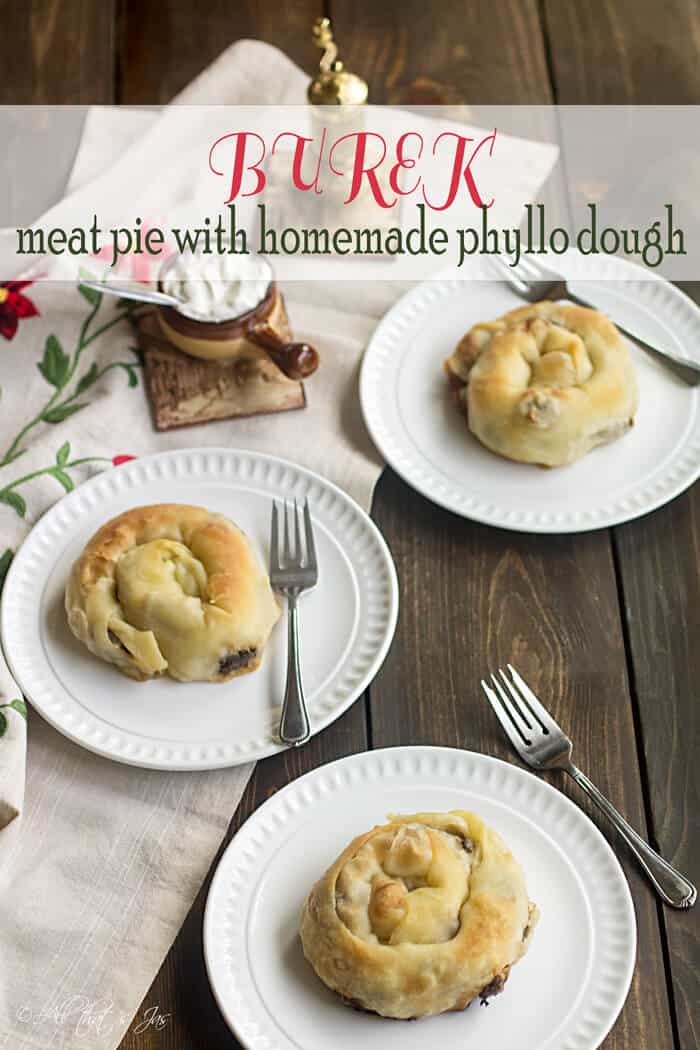
Pita filled with meat is called burek. You might remember a recipe for burek with layered phyllo dough I shared a long time ago. That's the shortcut version when I'm in a pinch yet still want to have pita.
The same goes for a pita with cheese and the one with cheese and spinach.
I can't quite put pita into one category. It is a kind of Bosnian street food, but you can eat it as a main dish, an appetizer, or snack. It tastes great warm or cold.
If you like being challenged in the kitchen, this is a recipe for you. It is lengthy and time-consuming if you're a beginner in making pita. It takes time and practice to make perfect.
Also, and I can't stress this enough, as with any new recipe please read the instructions several times until you're confident it makes sense to you. Then proceed to make the dish.
Ingredients:
- all-purpose flour
- salt
- oil
- ground or finely diced Beef or Veal (or combination of both)
- onion
- garlic
- salt and pepper
Directions:
Pastry:
- In a large bowl, whisk flour and salt to combine (with this method sifting flour is not necessary). Make a small hole in the middle and add water and two tablespoons of oil.
- Start mixing slowly from the middle out, using your fingers or a wooden spoon (I prefer fingers as I have better control and feel for it). Keep adding flour to the middle until the mixture forms a soft dough that isn't sticky. Note: Depending on air humidity, you might have a little bit of flour leftover or you might need to add some more. The dough should look similar to pizza dough.
- Turn dough onto a floured surface and knead until smooth and pliable. Coat the dough with one tablespoon oil, cover with plastic wrap, and set aside to rest up to an hour at room temperature or store in a refrigerator for up to two days (if refrigerated, allow the dough to reach room temperature)
Meat Filling:
- Combine all ingredients in a small bowl and leave to rest, covered and refrigerated until dough is ready.
Assemble:
- Line a large table with a clean tablecloth.
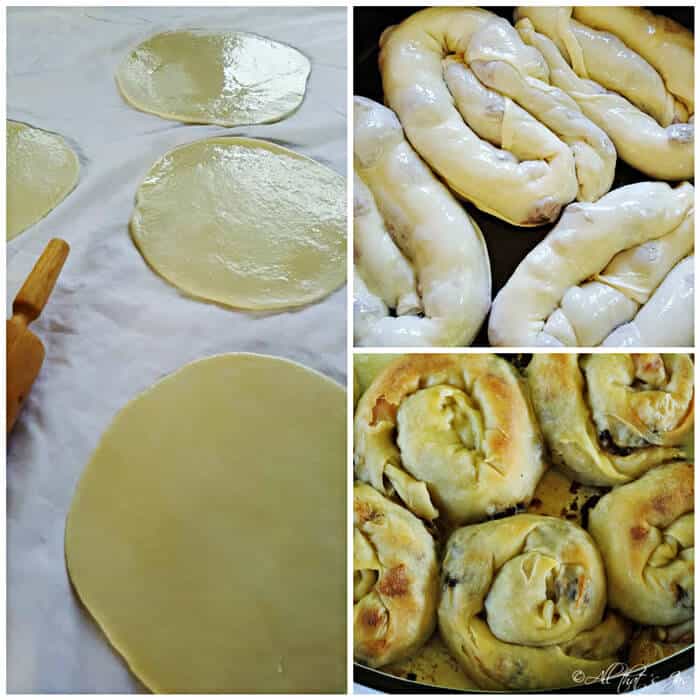
- Remove the rested dough to a lightly floured work surface. Divide into 4-6 smaller even pieces for individual pitas or into 2 balls for one large pita pie. Knead each ball until smooth for about two minutes.
- Using a rolling pin, roll out rounds to a flat circle. Coat each piece with more oil.
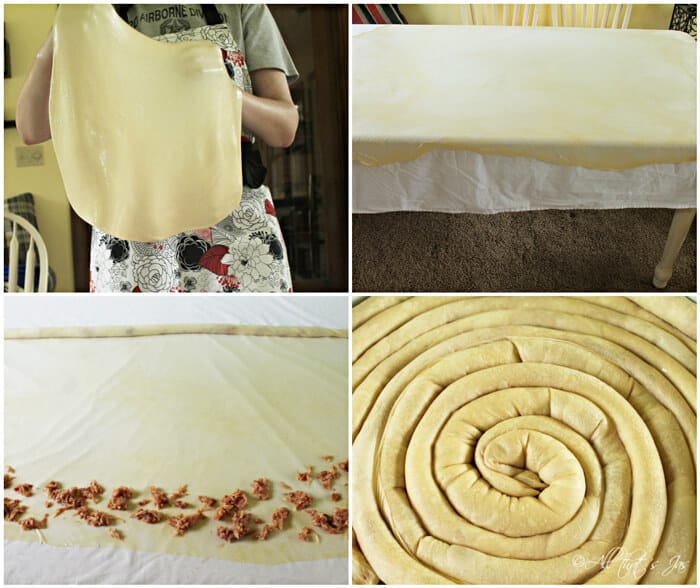
- Take one round of dough and place the edge over your floured fists so the rest hangs in the air. One at the time, move your hands up and down to rotate the dough (similar to the way pizza makers do), working your way around the edge of the dough until its weight allows it to stretch into a larger piece. When it's too large to handle, place it on the tablecloth. Note: If you are intimidated by this method, just use a rolling pin to stretch the dough as thin as possible without breaking it, and then continue to step 5.
- Preheat oven to 375 degrees Fahrenheit.
- Using your fingers, gently shake and pull the edge of the dough towards you to stretch out the center, until it's even and transparent. Take care not to tear holes in the dough. If you do, pinch them together. It doesn't have to be perfect; it won't be visible when pita is done. If making pita pie, the dough will eventually cover the tablecloth. Trim the thick outer edges and discard.
- Drizzle pastry all over with oil. For individual pitas, spread some of the meat filling over the pastry, then continue to the next step. For pita pie, put half the meat filling along the long edges of the pastry, leaving a one-inch border.
- Start to roll the dough on one side by lifting the tablecloth towards the middle into a long, thin log. If making a pita pie, lift up on both sides of the tablecloth then cut the dough between the two logs with a knife.
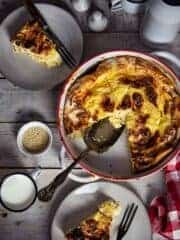
- Tightly coil the small individual pita rolls into a swirl. Place into a greased baking dish. For the pita pie, lay one end of the roll into the middle of a greased large round baking pan. Carefully wrap the remainder of the pastry roll around itself to form a snail-shaped pie. Take the second roll and continue where the other roll had ended. (If you don't have a round pan, then don't coil, just cut the roll the length of your rectangular baking sheet and place them next to each other).
- Brush the top of the pastry with more oil (no worries about this much oil, this dish needs it)
- Repeat stretching and rolling with remaining dough and filling.
- Bake for 35 to 45 minutes or until the top and base is crisp and golden.
Optional: Bring one cup of water and one tablespoon of butter to a boil and drizzle over the pita when done baking.
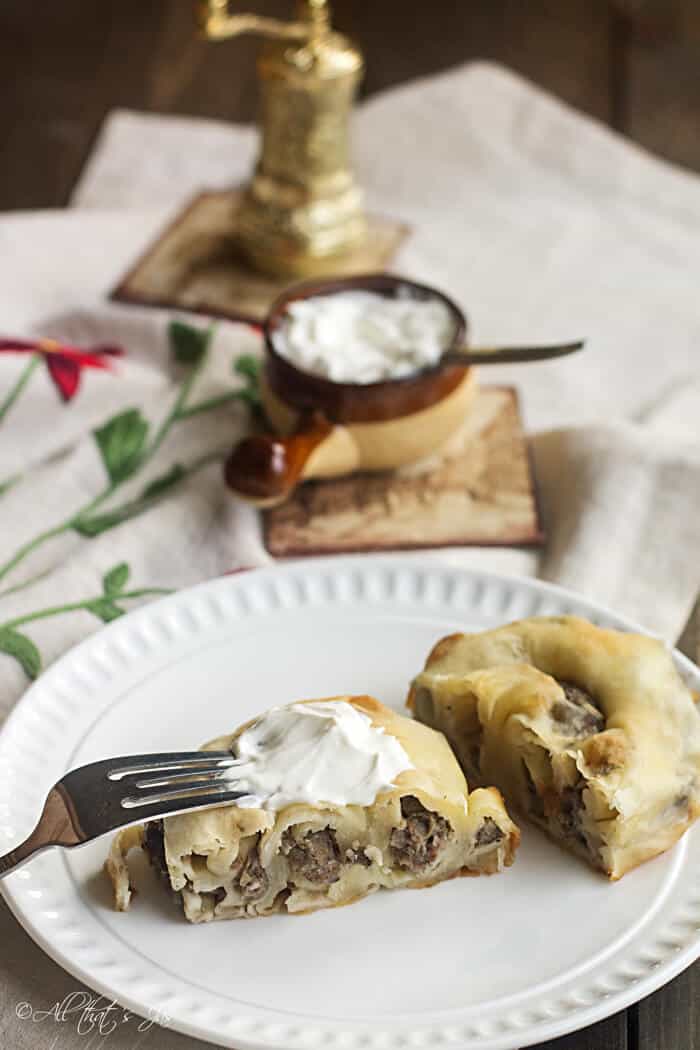
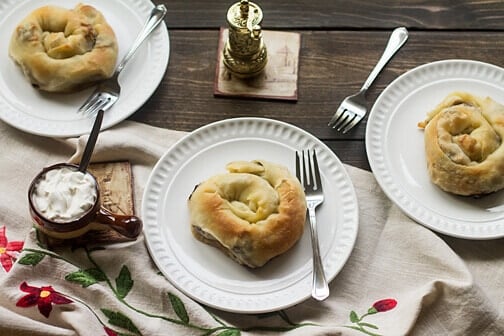
Serve warm or cold with plain yogurt, sour cream, or buttermilk. Call yourself a master of burek making 🙂
Liked this recipe? Leave a ⭐⭐⭐⭐⭐ rating in the recipe card below and/or a review in the comments section. Your feedback is always appreciated! Stay in touch through Pinterest, Instagram, and Facebook! Don't forget to sign up for my email list below too!
Meat Pie with Homemade Phyllo Dough – Burek
Ingredients
Pastry
- 2 cups all-purpose Flour, plus more for dusting
- ½ teaspoon Salt
- 1 cup warm Water
- 1 cup Oil, divided
Meat Filling
- 1 pound Ground or finely diced Beef or Veal, or combination of both
- 1 yellow Onion, chopped
- 1 clove Garlic, minced
- 2 teaspoons Salt
- 1 tablespoon Black Pepper
- ½ cup hot Water
Instructions
- Pastry:
- In a large bowl, whisk flour and salt to combine (with this method sifting flour is not necessary). Make a small hole in the middle and add water and two tablespoons oil. Start mixing slowly from the middle out, using your fingers or a wooden spoon (I prefer fingers as I have better control and feel for it). Keep adding flour to the middle until mixture forms soft dough that isn’t sticky. Note: Depending on air humidity, you might have a little bit flour left over or you might need to add some more. Dough should look similar to pizza dough.
- Turn dough onto a floured surface and knead until smooth and pliable. Coat the dough with one tablespoon oil, cover with plastic wrap and set aside to rest up to an hour at room temperature or store in a refrigerator for up to two days (if refrigerated, allow dough to reach room temperature)
- Meat Filling:
- Combine all ingredients in a small bowl and leave to rest, covered and refrigerated until dough is ready.
- Line a large table with a clean tablecloth.
- 1. Remove the rested dough to a lightly floured work surface. Divide into 4-6 smaller even pieces for individual pitas or into 2 balls for one large pita pie. Knead each ball until smooth for about two minutes.
- 2. Using rolling pin, roll out rounds to a flat circle. Coat each piece with more oil.
- 3. Take one round of dough and place the edge over your floured fists so the rest hangs in the air. One at the time, move your hands up and down to rotate the dough (similar to the way pizza makers do), working your way around the edge of the dough until its weight allows it to stretch into a larger piece. When it’s too large to handle, place it on the tablecloth.
- If you are intimidated with this method, just use rolling pin to stretch the dough as thin as possible without breaking it and then continue to step 5.
- 4. Preheat oven to 375 degrees Fahrenheit.
- 5. Using your fingers, gently shake and pull the edge of the dough towards you to stretch out the center, until it’s even and transparent. Take care not to tear holes in the dough. If you do, pinch them together. It doesn’t have to be perfect; it won’t be visible when pita is done. If making pita pie, the dough will eventually cover the tablecloth. Trim the tick outer edges and discard.
- 6. Drizzle pastry all over with oil. For individual pitas, spread some of the meat filling over the pastry, then continue to the next step. For a pita pie, put half the meat filling along the long edges of the pastry, leaving a one-inch border.
- 7. Start to roll the dough on one side by lifting the tablecloth towards the middle into a long, thin log. If making a pita pie, lift up on both sides of the tablecloth then cut the dough between the two logs with a knife.
- 8. Tightly coil the small individual pita rolls into a swirl. Place into a greased baking dish. For the pita pie, lay one end of the roll into the middle of a greased large round baking pan. Carefully wrap the remainder of the pastry roll around itself to form a snail-shaped pie. Take the second roll and continue where the other roll had ended. (If you don’t have a round pan, then don’t coil, just cut the roll the length of your rectangular baking sheet and place next to each other).
- 9. Brush the top of the pastry with more oil (no worries about this much oil, this dish needs it)
- 10. Repeat stretching and rolling with remaining dough and filling.
- Bake for 35 to 45 minutes or until the top and base are crisp and golden.
- Optional: Bring one cup water and one tablespoon butter to a boil and drizzle over pita when done baking.
- Serve warm or cold with plain yogurt, sour cream or buttermilk. Call yourself a master of burek making 🙂
AnneMarie says
Oooh that looks amazing!!!! I have never been brave enough to make homemade phyllo (the whole idea of rolling out a super thin dough terrifies me; I feel like I wouldn't be able to pinch together and fix all the tears haha), but these look really delicious!
allthatsjas says
Haha, yeah it takes some practice and tolerance - I don't always pinch all the tears. Thanks for stopping in and have a great day 😀