
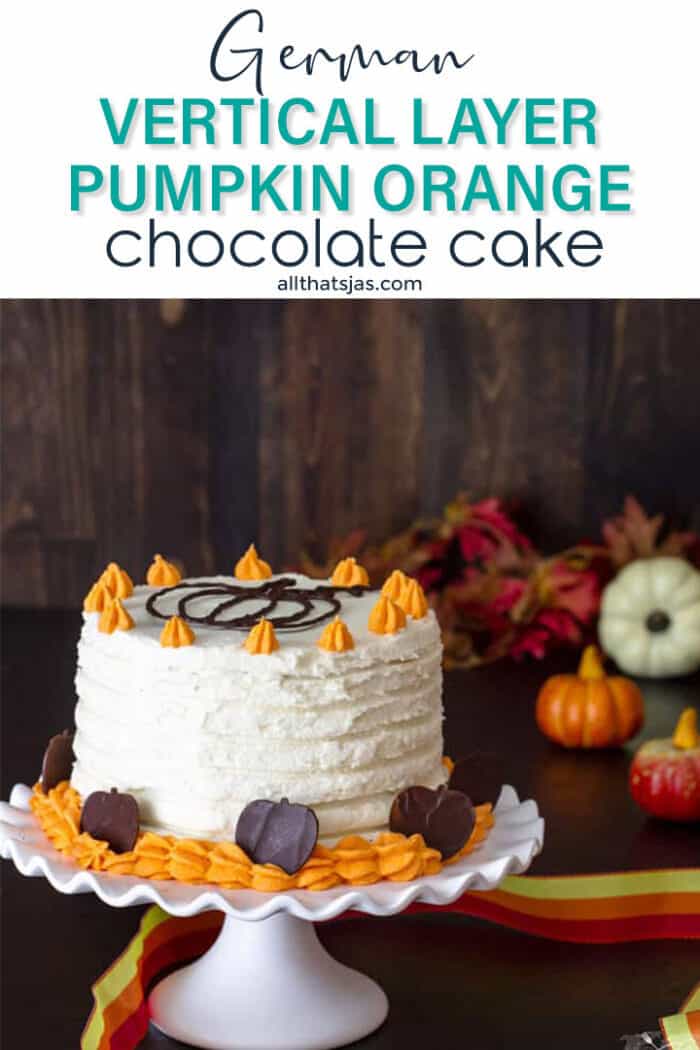
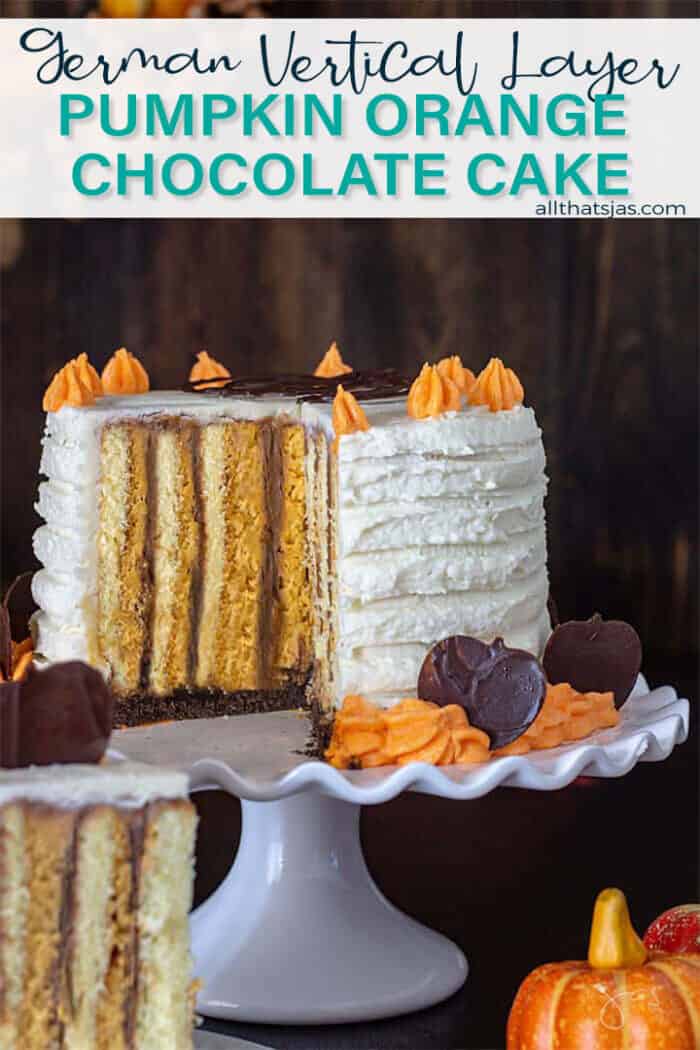
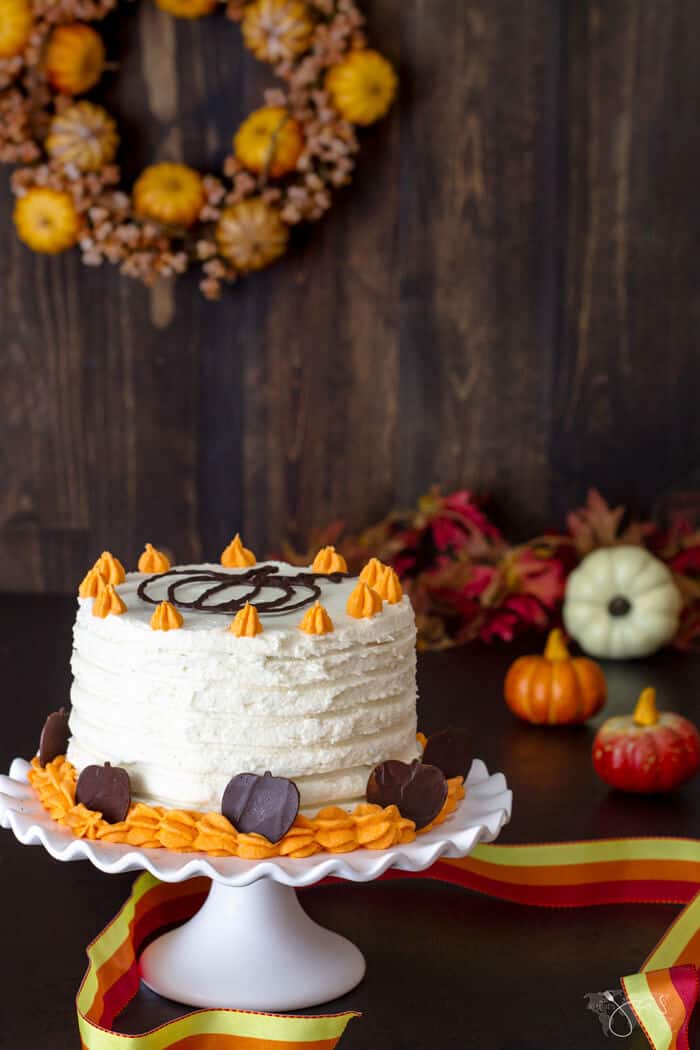
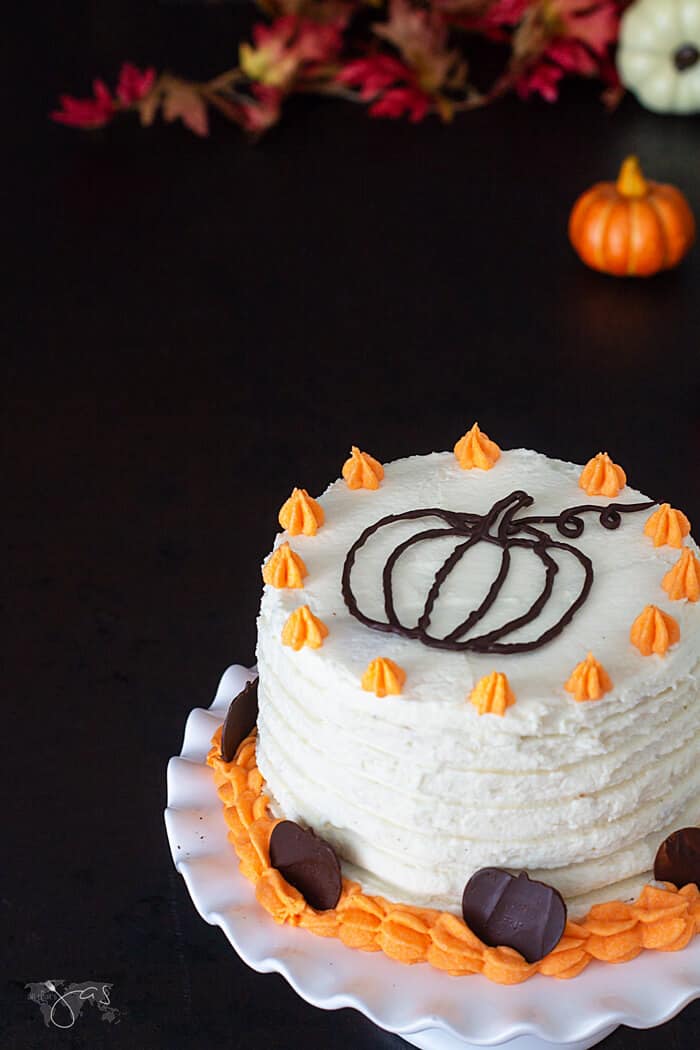
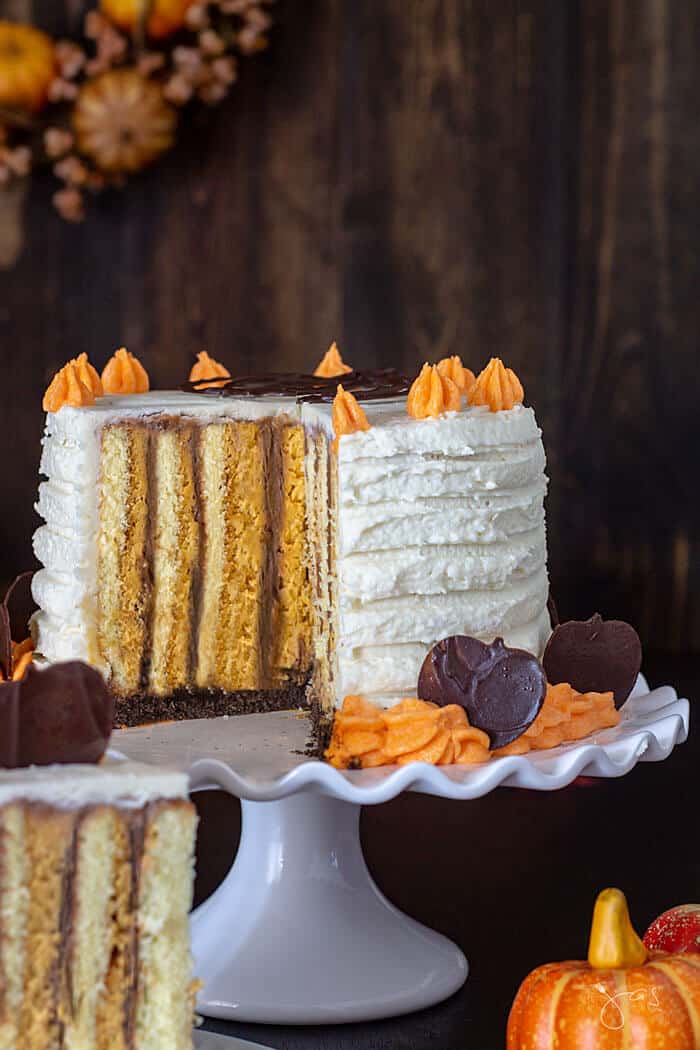
This decorative vertical layer pumpkin orange chocolate cake is a feast for your mouth and eye. Wow your family and friends by serving this amazing cake at your Thanksgiving table.
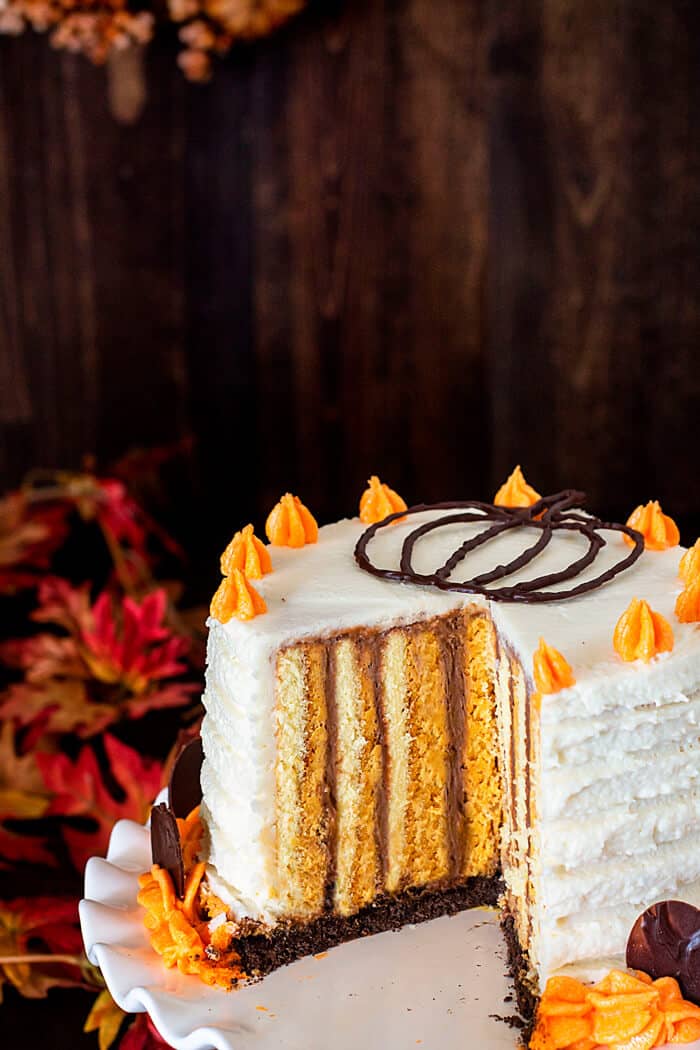
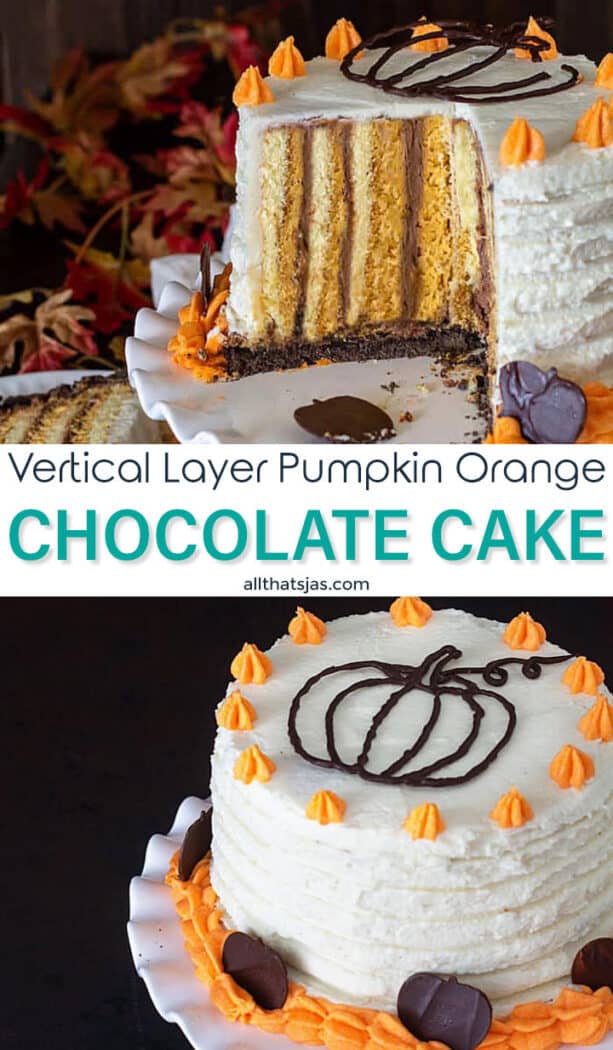
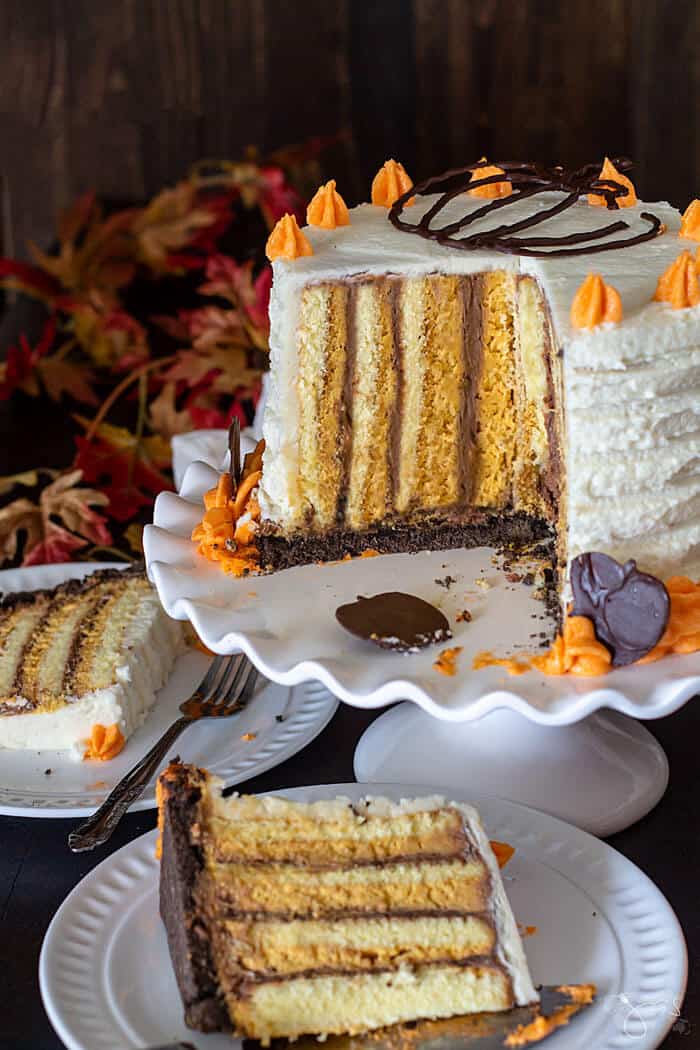
The vertical layers of a sponge cake, orange pumpkin, and chocolate are not the only attractive part. The flavor is definitely a conversation piece too.
What's to love about this pumpkin cake?
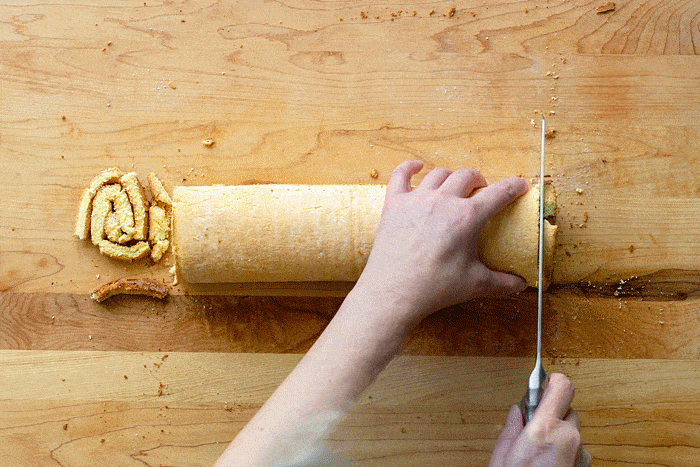
If you like jelly roll cakes, you will love this one too - it's basically a large Swiss roll cake turned on its side to create that vertical effect!
You probably already know that chocolate and orange complement each other but did you know pumpkin and orange is a match made in heaven? Add chocolate to that and BAM - a burst of delicious aromas in your mouth that will wake up all your senses.
Plus, how many cakes with vertical layers have you seen? This cake will definitely steal the show at any gathering!
Ingredients:
Traditional German recipe uses homemade pumpkin puree. I wasn't up for the lengthy process of cooking the pumpkin, so my shortcut was canned pumpkin puree and adjusting the ingredients for a tasty filling.
*Keep scrolling to get the full (printable) recipe, ingredient amounts, and more tips, or click on the "Skip to Recipe" button at the top of the page.
- pumpkin puree - canned, but you can make it from scratch if you prefer
- cream cheese - best if full fat
- chocolate instant pudding & pie filling
- all-purpose flour - sub with cake flour
- cocoa powder
- eggs - large
- sugar - use 1:1 sugar substitute
- powdered sugar
- butter - or margarine
- milk - full fat
- heavy cream
- oil - vegetable, corn, or canola oil
- cornstarch - also called cornflour in some countries
- vanilla and orange extract
- pumpkin pie spice
- vinegar or lemon juice
The process for this cake is above the beginner level. The first time I made this delicious vertical layer cake, it turned out great (must be the beginner luck). However, I didn't take many photos.
The second time it ended up in the trash bin. The fillings were too soft and they oozed out to the point of no saving it. 🙁
But fear not! By failing, I was documenting every detail, step by step, so you can learn from my mistakes. If I could make it, with this tutorial you can make it too!
This pumpkin cake is too good and too pretty not to give it a second and even a third chance. Yep, the third time is the charm.
HOW DO I MAKE CHOCOLATE GARNISHES?
Easy! Melt 1 cup chocolate candy melts (or chocolate without cocoa butter) over a double boiler.
For the large chocolate pumpkin:
- Print out (or draw) clipart of a pumpkin you like, and place under a piece of wax paper.
- Put 1-2 tablespoons of melted chocolate into a piping bag or a small Ziploc bag and cut off a small piece of one corner.
- Pipe the chocolate onto the wax paper, tracing the lines of the pumpkin underneath. Refrigerate until ready to use.
- Using a dough scraper, gently transfer the pumpkin to the top of the cake.
For small chocolate pumpkins:
- Spread remaining melted chocolate evenly in a thin layer on a piece of wax paper. Let cool at room temperature for 3-5 minutes, or until solid.
- Using a small pumpkin-shaped cookie (or cheese) cutter, cut out pumpkins. Refrigerate until ready to use.
Recipe notes:
- Before you run off buying ingredients, let me warn you that (a) the cake is rich, so if you're watching your weight - you can watch it grow and (b) making it will take a good portion of your day. Just don't start five other cooking projects at the same time as I did and you will be fine. 🙂
- I would also recommend reading ingredients, directions, and tips a couple of times before starting to bake. I get easily confused when I need to follow a complex recipe to a T and it helps me understand all the steps beforehand.
- You can slice the cake roll into 4 even strips. It will yield a shorter cake but with more vertical layers.
- If the fillings are too soft, refrigerate them to prevent oozing out of the cake, however, make sure they are still easily spreadable.
- To cut the cake for serving, keep a large serrated knife dipped in hot water. Clean the knife after each slice and warm it again in the water for the next slice.
- You can decorate the cake any way you like and even use a different frosting.
More fall desserts you will love:
- EASY EGGLESS APPLE CAKE
- BROWNIE PUMPKIN CHEESECAKE
- SWEDISH APPLE OATMEAL PIE
- GOAT CHEESE PUMPKIN CHEESECAKE
- APPLE PIE ROLLS WITH FILLO
- LAYERED MAPLE CHEESECAKE
Vertical Layer Pumpkin Orange Chocolate Cake
EQUIPMENT
- Jelly roll pan
Ingredients
Streusel Crust Layer
- 1 cup all-purpose flour
- 3 tablespoons cocoa powder
- ⅓ cup sugar
- 4 tablespoons butter, softened
Cake Layer
- 4 large eggs
- ½ cup + 1 tablespoon sugar, divided
- 1 teaspoon white vinegar or lemon juice
- ¼ cup milk
- ¼ cup vegetable oil
- 1 teaspoon pure vanilla extract, or 1 package vanilla sugar
- ½ cup all-purpose flour
- ½ cup cornstarch, corn flour
Pumpkin Orange Filling
- 1 cup canned pumpkin puree
- 2 teaspoons pumpkin pie spice
- 1 8 oz. package cream cheese, softened
- 1 stick butter, softened
- 1 ½ teaspoon orange extract
- 1 ½ cup powdered sugar
Chocolate Filling
- ½ cup milk
- 1 cup heavy cream
- 1 3.9 oz. package Chocolate Instant Pudding & Pie Filling mix
Brown Butter Cream Cheese Frosting
- 2 sticks butter
- 1 8 oz. package cream cheese, softened
- 1 pound powdered sugar
Instructions
Streusel Crust Layer
- Line an 8-inch springform pan with parchment paper. Spray the pan lightly with cooking spray to keep the paper in place. Preheat oven to 390 degrees Fahrenheit.
- In a mixing bowl, stir together the flour with cocoa powder. Add rest of the ingredients and mix until processed to a crumble.
- Press the mixture into the bottom of the pan. Bake for about 12-13 minutes.
- Transfer crust with parchment paper to a wire rack and cool completely. If you’re not using spring form let the crust cool completely in the pan before removing/turning over, otherwise, it will crumble.
Cake Layer
- Line a large jelly-roll or cookie pan with parchment paper (12x16-inch). Spray the pan lightly with cooking spray to keep the paper in place.
- Separate the egg whites and yolks. In a large mixing bowl, beat the egg whites and vinegar with an electric mixer on high speed until foamy. Gradually add ½ cup sugar and beat until stiff peak form, about 8-10 minutes.
- In a separate bowl, whisk the egg yolks with 1 tablespoon sugar until pale yellow in color. Stir in the milk, oil, and vanilla.
- Sift in the flour and cornstarch. Whisk until the mixture is smooth.
- Gently mix one part of the egg white mixture (about the ¼ of the whole mixture) with the yolk mixture until creamy. Pour into the bowl with remaining egg whites. Gently fold to blend together to form a smooth and light, batter. Be careful not to deflate the air pockets because the cake might not rise properly.
- Gently pour the batter into the prepared pan and spread evenly with an offset spatula. Tap the pan on the counter a few times to break any large air bubbles in the batter. Bake on 325 degrees Fahrenheit until lightly springy when touched, about 20-30 minutes.
- Dust a clean, large kitchen towel with the confectioners' sugar and flip the cake out onto the towel with the short side facing you. Remove the parchment paper and roll up the cake in the towel away from you. Set aside to cool.
Pumpkin Orange Filling
- Beat cream cheese and butter until smooth and creamy. Add the sugar and beat until smooth and fluffy. Add orange extract, pumpkin puree, pumpkin pie spice and beat until thoroughly combined.
Chocolate Filling
- Whisk instant pudding with milk and heavy cream until creamy and thick.
Brown Butter Cream Cheese Frosting
- Brown the butter over medium heat. Let it simmer until all the water boils off and it turns a golden brown in color.
- Immediately remove from the heat and let sit for 5 minutes. Transfer into a heatproof bowl and chill until it solidifies.
- Mix the cooled butter with all the frosting ingredients and beat until smooth and fluffy. If necessary, add just enough milk (1-2 teaspoons at a time) to get the perfect spreadable consistency.
To Assemble
- On a large cutting board, unroll the cooled cake so it lays flat. Trim the short ends so they are flat and roll the cake again into a log without the towel. Cut the ends of the log with a serrated knife to help create clean, even layers. Slice the log into 3-4 even strips, using a tape measure if necessary (see Free Tip section for details).
- Unroll the strips and spread all but 3 tablespoons of the pumpkin orange filling onto each strip. Top with the chocolate filling. Refrigerate fillings before assembling the cake if they’re too soft.
- Roll the first strip of cake into a spiral. Some of the fillings might ooze out but that's OK. Roll the first spiral into the second cake strip. Continue rolling into a spiral until all strips are used. Refrigerate for about 1 hour to set.
- Place the cooled crust onto a cake stand or serving platter. Spread 3 tablespoons of the pumpkin orange filling over the crust. Add the rolled cake on the top. The crust might be a bit larger than the rolled cake but after you add the frosting, it will be just right (you can always trim it down if you prefer). Cover with the brown butter cream cheese frosting. Smooth the edge and top of the cake.
- Mix in orange food coloring to the remainder of the frosting until desired shade is reached. Use a star tip (or tip of your preference) to pipe frosting around the bottom of the cake and on the top, or decorate as you wish. Refrigerate the cake for about 1 hour or overnight.
- Garnish with the chocolate pumpkins if you desire (see the recipe in the post).
Notes
- Making this cake will take a good portion of your day. Start a day ahead by baking the crust and cake layer and assemble the next.
- I would also recommend reading ingredients, directions, and tips a couple of times before starting to bake. It always helps understand all the steps beforehand.
- You can slice the cake roll into 4 even strips. It will yield a shorter cake but with more vertical layers.
- If the fillings are too soft, refrigerate them to prevent oozing out of the cake, however, make sure they are still easily spreadable.
- To cut the cake for serving, keep a large serrated knife dipped in hot water. Clean the knife after each slice and warm it again in the water for the next slice.
- You can decorate the cake any way you like and even use a different frosting.
- Please keep in mind that nutritional information is a rough estimate and can vary significantly based on products used.


Rylie says
This seems like an amazing cake! But I am scared to make it because I have never made a vertical layer cake before. Is it really hard to make a vertical layer cake? If so, is there any resources so I can learn how to make this?
Jas says
Thank you, Rylie! If you have made a jelly roll (or Swiss roll) cake before, you can make this one too. You're essentially rolling up a sponge cake covered in fillings and turning it onto its side and then adding frosting all over. Takes some time and patience, but it can be done. Good luck!
Tianna says
this is so cool! you did an amazing job!
Jas says
Thank you so much, Tianna! 🙂
Carol says
WOW!!! This is one gorgeous cake! So perfect for Fall. Featuring when my link party opens up tonight!
Jas says
Thank you so much for the feature, Carol! You made my day 🙂
Oh My Heartsie Girl says
Hi Jas, thank you so much for sharing your recipe in #omhgww last week. Your directions are explicit, very detailed. Im like you when the directions are complex I reread several times before proceeding!!
Jas says
The only way to avoid mistakes (well, at least most of them, lol). Thank you, Karren! xx
Jodie Fitz says
You have been FEATURED at Reader Tip Tuesday.
Just love this!!! Hope you grab a button! looking forward to your share this week...
Jas says
Thank you so much, Jodie! I'm thrilled 😀
eclecticredbarnBeverly says
Wow, what an amazing cake. This is when you wish you could reach into your computer an get a bite. You never cease to amaze. Stop by Over The Moon since you are being featured.
Hugs,
Bev
Jas says
Thank you, Bev! I'm super grateful for your kindness! xx
Kippi says
Beautiful cake. I am pinning this beauty and I hope mine turns out as pretty as yours.
Jas says
Thank you, Kippi. Just have patience and it'll turn out even better than mine. I was rushing it, lol.