
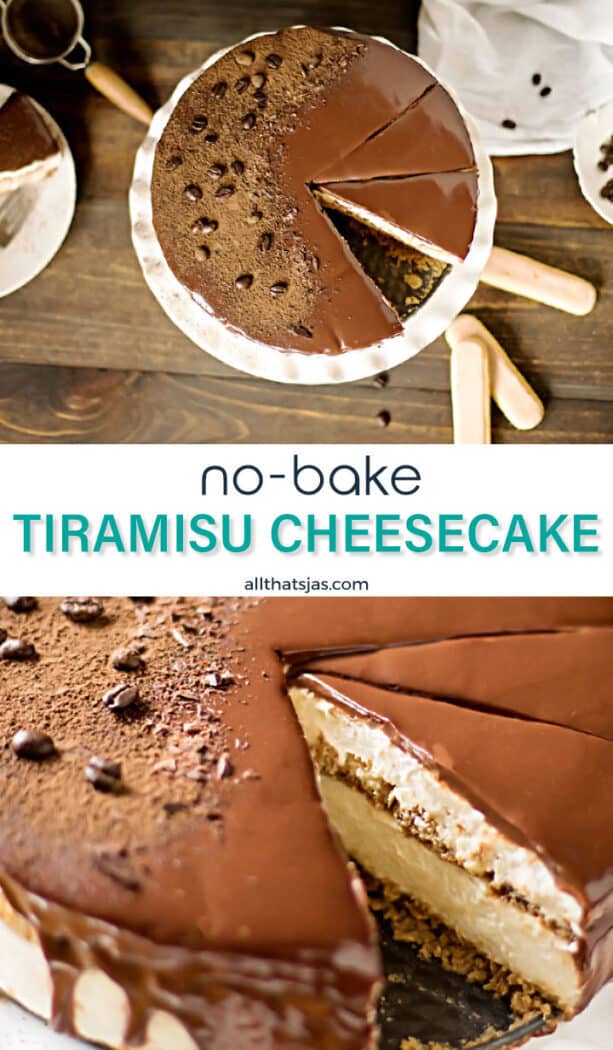
Need an amazing dessert to perfectly round off your dinner? This delicious creamy tiramisu cheesecake will knock your socks off! Best of all, this cheesecake is a no-bake cake so you can keep your oven off this summer!

First off, can we just agree that combining two cakes into one is the most brilliant invention since sliced bread?
What is Tiramisu?
Tiramisu means "pick me up", "cheer me up" or "lift me up") and it's a coffee-flavored Italian dessert. It is made of ladyfingers dipped in coffee, layered with a whipped mixture of eggs, sugar, and creamy mascarpone cheese, and flavored with cocoa. The recipe has been adapted into many varieties of cakes and other desserts.
My original tiramisu cheesecake went viral on Pinterest. It's a beautiful, extremely decadent cake but it takes quite some time to make. Wouldn't you want an easier, quicker version of it? Of course, you would. So here it is a no-bake tiramisu cheesecake.
If it still looks complicated, trust me it's not! You'll love how easy it is to make it and you will make it over and over again, of that I'm sure!
Too Delicious to Pass up?
I can't emphasize enough how insanely delicious this cake is but maybe this will convince you: my daughter who is currently on a diet (and unlike her mother, she has crazy self-control because who diets when they're already skinny?) got mad at me for offering her a piece of cake.
But then she opened my fridge, took one look at the cake, and ended up eating a big piece, hovering over it on the counter like a wild animal, LOL. Need I say more? 🙂
What I like the most about this cake is that you can easily mix and match the layers. For example, omit the middle ladyfinger layer and spread the tiramisu mixture straight onto the cheesecake layer. Replace the chocolate ganache layer with cocoa powder, chocolate shavings, or whipped cream.
Make it your own but make it! You will absolutely love it! If serving your guests, may I suggest an entree? Karageorge schnitzel for meat lovers and for vegetarians my Vatican's cheese quiche. Both are delicious and impressive. Your company will be talking about your awesome dinner for months!
🔪 Instructions
Step 1 - Crust & Cheesecake Layer
- Combine the crushed ladyfingers with melted butter and espresso. You can crush them using a food processor or put them in a Ziploc bag and roll over with a rolling pin until coarsely crushed. Press the mixture into an 8-inch springform.
- In a small bowl, pour boiling water over gelatin. Stir until gelatin is completely dissolved. Let cool slightly. If it cools too much and it hardens, microwave for 15-20 seconds. Do not boil. This step is optional. I have never had luck getting the filling firm enough without the gelatin.
- Combine the cream cheese, sugar, and coffee in the bowl of a stand mixer fitted with a paddle attachment (alternatively, use a hand mixer and a large bowl). Mix at low speed to form a thick paste, and then increase to medium speed until soft and smooth. Scrape the bowl and beater with a flexible spatula, then switch to the whisk attachment and pour in the cream. Whip at high speed until stiff peaks form.
- Gradually beat in gelatin mixture into the cream cheese mixture, if using. Scrape into prepared crust and spread into an even layer. Transfer the cake to the freezer until set, for about an hour.
Step 2 - Tiramisu Layer
- In a medium-size bowl, whip the cream with the mixer on high speed until it thickens and soft peaks begin to form. With the mixer still running, add the sugar and beat until the stiff peaks form. Beat in vanilla. Gently fold in the mascarpone with a rubber spatula.
- Top the cold cheesecake, still in the pan, with a layer of ladyfingers briefly dipped into coffee. Break a few into pieces to fill in the empty spaces.
- Spoon the mascarpone mixture on top of the ladyfingers and gently even out with a frosting spatula without disturbing the layer. Return to the freezer for 15-30 minutes or until set.
Step 3 - Chocolate Ganache
- Meanwhile, place the chocolate into a medium bowl. Heat the cream in a small saucepan over medium heat. Bring just to a boil, watching very carefully because if it boils for a few seconds, it will boil out of the pot.
- When the cream has come to a boil, pour it over the chopped chocolate and let sit until chocolate has softened, about 3-5 minutes.
- Add butter and whisk until smooth. Allow ganache to cool slightly before pouring over a cake.
- Remove the cake from the freezer. Release and gently remove the sides of the springform (you can let it stand at room temperature for 10 minutes before removing the sides).
- Pour chocolate ganache over the tiramisu cheesecake. Start at the center of the cake and work outward.
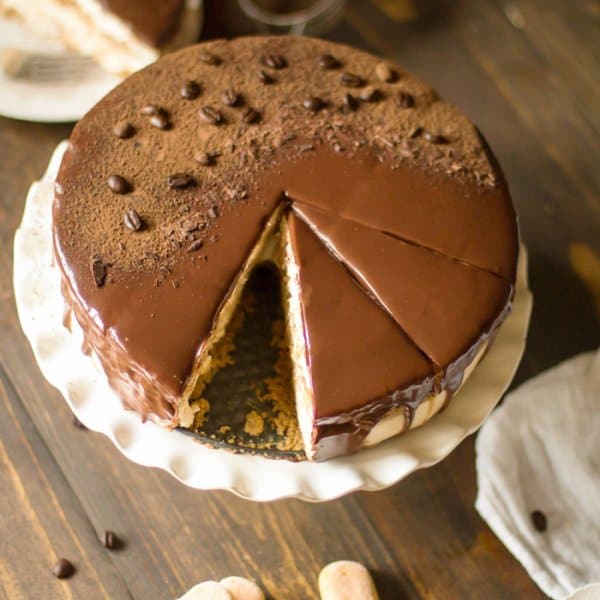
- Decorate the cake as desired.
Refrigerate at least for 2 hours, until the ganache layer is cold and the cheesecake layer has defrosted. Slice the cake with a sharp straight-edge knife cleaning it with a paper towel between each slice. Store the cake in the refrigerator.
- Carrot Cake Cheesecake
- Tiramisu Cheesecake
- Baklava Cheesecake
- Brownie Pumpkin Cheesecake
- Layered Maple Cheesecake

Liked this recipe? Leave a ⭐⭐⭐⭐⭐ rating and/or a review in the comments section. Your feedback is always appreciated! Stay in touch through Pinterest, Instagram, and Facebook! Don't forget to sign up for my email list below too!
The Best No-Bake Tiramisu Cheesecake
EQUIPMENT
- springform pan
Ingredients
Crust:
- 18 ladyfingers, coarsely chopped or crushed
- 3 tablespoons butter, melted
- 3 tablespoons strong coffee
Cheesecake layer:
- 1 tablespoon or 1 envelope unflavored powdered gelatin (optional)
- ½ cup boiling water
- 16 oz. cream cheese, at room temperature
- ½ cup sugar
- 1 ¾ cup heavy cream
- 1 tablespoon strong coffee
Ladyfinger layer:
- 12-14 ladyfingers
- 1 cup strong coffee
Tiramisu layer:
- 8 oz. Mascarpone cheese, at room temperature
- 1 tablespoon pure vanilla extract
- 1 cup cold heavy cream
- 2 tablespoons sugar
Chocolate ganache:
- 8 oz semi-sweet chocolate, chopped
- 1 cup heavy cream
- 1 tablespoon butter
Instructions
Step 1
Crust and cheesecake layer
- Combine the crushed ladyfingers with melted butter and espresso. You can crush them using a food processor or put them in a Ziploc bag and roll over with a rolling pin until coarsely crushed. Press the mixture into an 9-inch springform.
- In a small bowl, pour boiling water over gelatin. Stir until gelatin is completely dissolved. Let cool slightly. If it cools too much and it hardens, microwave for 15-20 seconds. Do not boil. This step is optional. I have never had luck getting the filling firm enough without the gelatin.
- Combine the cream cheese, sugar, and coffee in the bowl of a stand mixer fitted with a paddle attachment (alternatively, use a hand mixer and a large bowl). Mix at low speed to form a thick paste, and then increase to medium speed until soft and smooth. Scrape the bowl and beater with a flexible spatula, then switch to the whisk attachment and pour in the cream. Whip at high speed until stiff peaks form.
- Gradually beat in gelatin mixture into the cream cheese mixture, if using. Scrape into prepared crust and spread into an even layer. Transfer the cake to the freezer until set, for about an hour.
Step 2
Tiramisu layer
- Top the cold cheesecake, still in the pan, with a layer of ladyfingers briefly dipped into coffee. Break a few into pieces to fill in the empty spaces.
- Spoon the mascarpone mixture on top of the ladyfingers and gently even out with a frosting spatula without disturbing the layer. Return to the freezer for 15-30 minutes or until set.
Step 3
Chocolate ganache
- Meanwhile, place the chocolate into a medium bowl. Heat the cream in a small saucepan over medium heat. Bring just to a boil, watching very carefully because if it boils for a few seconds, it will boil out of the pot.
- When the cream has come to a boil, pour it over the chopped chocolate and let sit until chocolate has softened, about 3-5 minutes.
- Add butter and whisk until smooth. Allow ganache to cool slightly before pouring over a cake.
- Remove the cake from the freezer. Release and gently remove the sides of the springform (you can let it stand at room temperature for 10 minutes before removing the sides).
- Pour chocolate ganache over the tiramisu cheesecake. Start at the center of the cake and work outward.
- Decorate the cake as desired.
Notes
- See post for layer suggestions.
- Carefully slide a pie server under the crust, making sure it reaches all the way to the tip of the wedge (the first slice is the most difficult and messy to remove).
- Nutrition information is approximate and meant as a guideline only.


Andi says
Hello, the directions say to use an 8” springform pan. Is that what you used? The pictures make the cheesecake appear larger than 8”. Just wanted to double check before making this for my daughter’s birthday. Thank you.
Jas says
Hi, Andi! I believe I used 8" (it was so long ago, lol). You can certainly use a 9" (just to be safe) or even 10" inch pan. The only difference will be the hight of the cake. Happy Birthday to your daughter! 😀
jayne mcauliffe says
MUST YOU WHIP THE CREAM SEPARATELY OR WHILE THE CREAM CHEESE MIXTURE IS STILL IN THE BOWL? IF SO, DOES IT GET TO GET TO STIFF PEAK STAGE? SORRY IF I SOUND IGNORANT BUT I’VE NEVER TRIED THAT METHOD BEFORE!
Jas says
Hi Jayne, no need to apologize! I'm glad to answer any questions and clarify confusions. 🙂 In short, the answer is NO. It's instructed to: "...pour in the cream. Whip at high speed until stiff peaks form." 🙂
jayne mcauliffe says
Thanks so much for taking the time to reply. i didnt read the recipe properly, but i see now. WOW - its fantastic. My decorating skills are not wonderful, but what a magnificent dessert!
Jas says
Anytime, Jayne! No worries, I don't always decorate it either. 😉
Xhulio Jamaku says
Hi Jas,
I really really love your blog. Your posts are amazing. Especially, the tiramisu is omg. I love how simply you make them look. Thank you so much for the good work. I recently got inspired and started my new cooking blog. I would love to be featured on your website.
I would really appreciate it!
Thank you so much for everything.
Love,
Xhulio
Jas says
Hello, Xhulio!
Thank you for your kind words. We are neighbors (I'm from ex-Yugoslavia) 🙂
You had me at cheesecake - I'm obsessed with them!
If you'd like to guest post on my site, you can read the guidelines here. However, my editorial calendar is full for the next few months but that will give you some time to create more yummy recipes on your blog. You can email me your ideas and, if approved, I can schedule it for the next open spot. Unless you had something different in mind by being featured?
Best,
Jas
Xhulio Jamaku says
Thank you so much from the kind words! Yess I am from Albania. I will work hard on new recipes for sure. I will write you an email within the day to discuss this further.
Thank you so much and keep posting for us. We love it!
Xhulio
Jas says
Thanks!
Siân says
Could the be frozen?
Jas says
Absolutely! Once properly frozen, it can last in your freezer for up to 3 months. When you are ready to eat it, simply put it in the fridge to allow it to thaw overnight.
Unless you have a container for it, use two layers of cling wrap, or roll the wrap twice over the cake to make sure that it is airtight.
You can wrap either by individual slices if you are not planning to eat everything right away or as a whole if you are sure that you can consume everything once thawed.
Cover the wrapped cake with aluminum foil, then freeze. 🙂
Lori Hill-Smith says
Nothing better than cheesecake and chocolate! Thank you for sharing at #BloggingGrandmothersLinkParty
Jas says
You've got that right! 😉
Teresa - Aging Like a Fine Wine says
I love the words "no bake" and "simpler version"! Looks delicious! Thank you for linking it up at the #BloggingGrandmothersLinkParty.
Jas says
Me too. Who wants to spend hours baking, ha!
Sue from Sizzling Towards 60 & Beyond says
Thanks for your strong support of #BloggingGrandmothersLinkParty, Jas. This cheesecake sounds delicious and is on my list!
Jas says
Thank you for all you do for the group, Sue! 😀
Grammy Dee | Grammy's Grid says
Another no bake, my fav words when preparing in the kitchen 🙂 Thank you Jas for linking up at the #BloggingGrandmothersLinkParty. I shared your post on Facebook, Google+, Pinterest, and Twitter.
Jas says
Ha ha, mine too! 😀
Jenna Meon says
Gorgeous! I love the way you garnished it!
Jas says
Thank you, Jenna! 🙂
Linda on Poinsettia Drive says
Oh my that is heaven...thank you for sharing, I must share. Hugs, Linda on Poinsettia Drive
poinsettiadr.com
Jas says
Haha, thank you, Linda! Please do 😀 XOXO
Jhuls | The Not So Creative Cook says
OMG! This cake is calling out my name!! Absolutely divine! Thanks for sharing!
Jas says
Thanks, Jhuls! I hear it calling my name almost every week, LOL
Beverly says
I can't believe this gorgeous, delicious dessert is easy to make! I'm definitely going to try your recipe. There's a fabulous dessert cafe in downtown Charleston that makes a delicious tiramisu. Yours looks even better than theirs. I'm featuring this at today's Snickerdoodle Party. Thanks for sharing your wonderful recipes with us, Jas!
Jas says
Thanks, Beverly, I am thrilled! Let me know how it turned out for you 😀